The Optimization Rules feature allows you to create any rule which will automatically blacklist / whitelist the sources which follow the rule.
To create optimization rules, follow the steps below:
1. On the New Campaign page, click advanced settings.
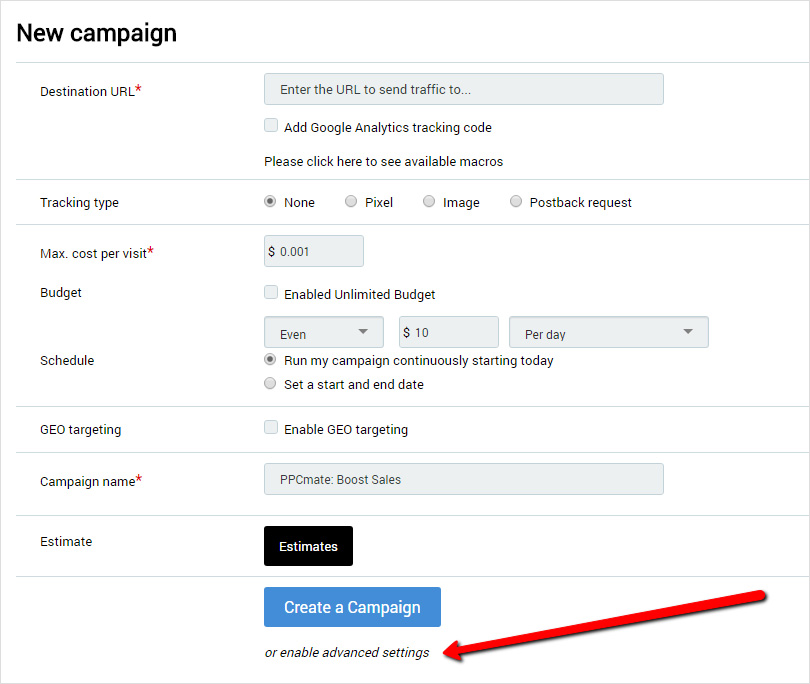
2. Enable the Optimizations rules option and enter the rule.

NOTE: We do not recommend creating optimization rules when you set up a new campaign not to cut off traffic completely. Do some initial research into your campaign’s performance to understand what volume and quality of traffic you get based on your targeting options.
Below you can find the definition of each targeting option and metric:
Targeting option
pub_ID – publisher ID.
site_ID – ID of the site/ which can include one and more domains.
domain – domain.
placement – the exact place where an ad is displayed on a page.
NOTE: The more precise targeting option you set, the more targeted strike at the sources you make. Setting less precise targeting option may lead to blacklisting/whitelisting the sources which potentially work/don’t work for your goals. The most precise targeting option is placement. Less precise are domain and site_ID accordingly. The least precise targeting option is pub_ID.
Metric
impressions – the number of times your ad was displayed.
accepted_clicks – the number of visits.
conversions – the number of desired actions made on the landing page.
cpc – cost per click.
cpa – cost per action.
media_cost – the amount spent on advertising
roi – return of investments.
NOTE: If there are no particular metrics in our settings, you can use several metrics to reach your goals.
For example, using accepted_clicks and impressions metrics you can get CTR (click through rate, visit rate) metric. Lets say if you want CTR > 0.2 (or 20 per cent), you can use according number of impressions and accepted clicks in the rule to reach your goal. E.g. impressions > 10000 and accepted_clicks < 2000 (to blacklist) or impressions < 10000 and accepted_clicks > 2000 (to whitelist).
Period
Today
Step 1. The system will check all sources starting from 00:00 on the day the rule was applied till the time the rule was enabled. If there are sources which follow the rule, they will be blacklisted/whitelisted immediately.
Step 2. The system will be checking sources every 15 minutes starting from the time the rule was enabled for the period of time from 00:00 same day till 00:00 next day. All the sources which follow the rule will be blacklisted/whitelisted every 15 minutes.
Yesterday
If yesterday is selected, the rule will be applied to the selected targeting option for the whole previous day. All the sources which follow the rule will be blacklisted in the beginning of the next day.
Last n days
Step 1. The system will check all sources starting from the time the rule was applied till n days back. E.g. if the rule was implemented at 10 am on February, 5 for last 2 days, the sources will be checked since 10 am on February, 5 back till 10 am on February, 3. If there are sources which follow the rule, they will be blacklisted/whitelisted immediately.
Step 2. The system will be checking sources every 15 minutes starting from the time the rule was enabled for the period of time from n days back till now. E.g. if the rule was implemented at 10 am on February, 5 for last 2 days, the sources will be checked every 15 minutes due to the following schedule: February, 3 10:15 am – February, 5 10:15 am ; February, 3 10:30 am – February, 5 10:30 am ; February, 3 10:45 am – February, 5 10:45 am ; etc. All the sources which follow the rule will be blacklisted/whitelisted every 15 minutes.
You can use any number of metrics within one rule and as many rules as necessary within one campaign.
Be careful with the logics upon creating the rules not to blacklist/whitelist the sources which you don’t mean to.


